How to Practice PDR at Home: Panels, Lighting, and Daily Drills
Practicing Paintless Dent Repair (PDR) at home is one of the most important steps in becoming a skilled technician. Training provides the foundation, instruction, and guidance, but practice builds the ability. PDR is a technique-based craft, where repetition develops control, confidence, and surface awareness. The more time you spend practicing in a structured way, the faster your skill grows. The goal of home practice is not to work fast — the goal is to work accurately. Accuracy becomes consistency. Consistency becomes speed. Speed becomes earning power. And it begins in your practice environment.
Many new students make the mistake of practicing randomly or without a plan. They push dents without understanding reflection, they choose panels that are too difficult, or they try to move dents aggressively instead of gradually. Skill development requires calm focus. The right practice environment sets you up for success. When you create a practice setup at home that mimics professional workflow, your progress becomes measurable and steady.
“You do not become skilled by trying harder. You become skilled by practicing correctly.”
Choosing a Practice Panel
The ideal practice panel is one that is stable, accessible, and repeatable. The most common starting point is a hood panel taken from a salvage yard or automotive recycler. A hood is large enough to provide surface area, stable enough to remain steady while applying pressure, and accessible from the underside for tool placement. Practicing on a hood allows you to develop hand positioning, leverage control, and reflection reading.
The panel should be mounted securely. Movement in the panel makes learning harder because you cannot feel accurate resistance. A panel mounted on a stand provides the stability needed to learn controlled pressure. Place the panel at a comfortable height that allows you to work without bending or straining.
The goal in early practice is not to remove dents perfectly. It is to learn how to see and control the metal.
Setting Up Lighting Correctly
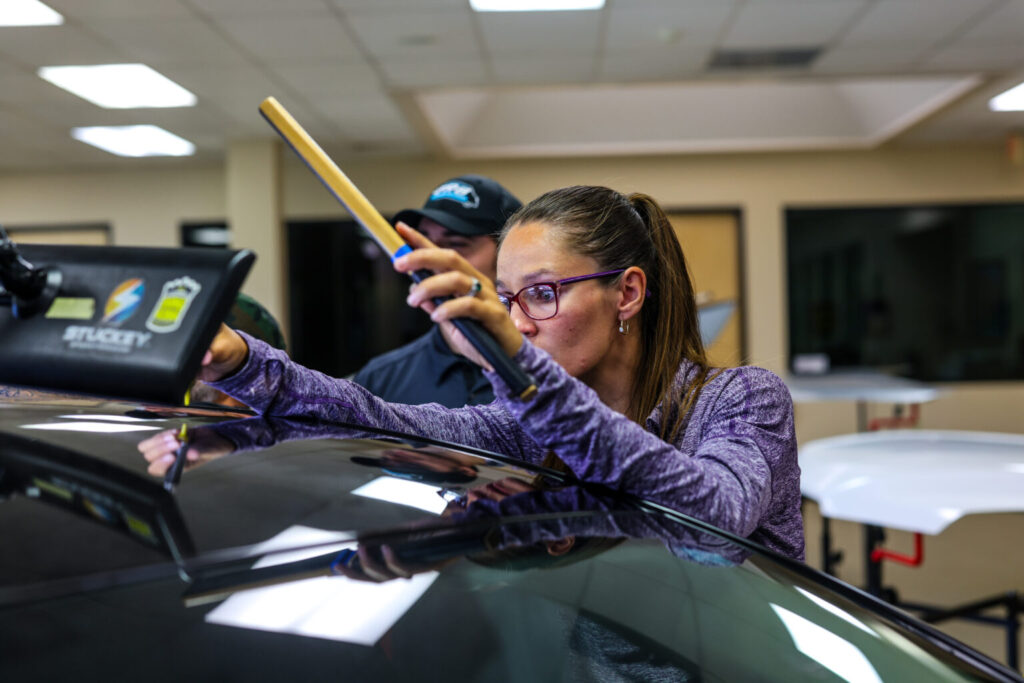
PDR relies on light reflection. The dent is visible not by looking directly at the surface, but by watching how reflection lines bend across the damaged area. Proper lighting is what allows you to read the dent. A LED PDR light or reflection board must be positioned so the lines reveal the center, depth, and slope of the dent.
The distance between the light and the panel, as well as the angle, changes how the dent appears. In practice, you will move the light often. You are training your eyes to see subtle movement. This is not a one-time setup — it is part of the craft. Over time, your eyes begin to detect patterns instinctively. Reflection reading is the language of PDR. The light teaches your eyes what the metal is doing.
“Once you learn to read the reflection, the dent tells you what to do next.”
Daily PDR Practice Drills
Practice should be structured and repetitive. Skill builds by doing the same movements again and again until they become natural. The goal is not to finish quickly, but to finish cleanly, with no visible highs or texture.
-
Center Push Practice
Make small dents intentionally and practice locating the exact center before applying pressure. This trains your eyes to read reflection patterns and align tool placement precisely. -
Controlled Pressure Rises
Apply the smallest amount of pressure possible to move the dent upward slowly. The purpose is to learn how the metal responds to micro-movements. -
Tap-Down Practice
After pushing, practice tapping down micro-highs evenly, using a consistent rhythm and pressure. This develops finishing control. -
Edge-to-Center Blending
Practice repairing dents from the outer transition inward. This teaches how to shape the panel gradually without creating distortions.
These drills train the hands to move quietly and smoothly. Skill in PDR is measured in subtlety.
Where to Place Your Body and Tools
Body position affects everything. The tool is only steady when your body is steady. The leverage comes from controlled posture, not arm strength. Align your body so:
-
Your feet are stable
-
Your torso supports the tool
-
Your hand is the guide, not the source of force
When the body supports the push, movement is calm and predictable. When the hand tries to force the metal alone, pressure becomes uneven. This is where many beginners create high spots. Stability allows precision.
How to Use Glue Pulling in Practice
Glue pulling helps you learn the feel of metal movement from the outside inward. It teaches tension awareness. The goal in glue pulling practice is not to yank dents out. It is to observe how the metal reacts. Many dents repaired from the outside must still be blended and refined. Glue pulling is not a shortcut — it is part of complete dent restoration skill.
Glue pulling also helps practice:
-
Working on aluminum
-
Access-limited areas
-
Large, shallow dents
It is a valuable training tool, not a replacement for pushing technique.
Common Practice Mistakes
Many beginners experience the same challenges:
-
Pushing too hard too early
-
Trying to finish dents before controlling shape
-
Not repositioning the light often enough
-
Ignoring tap-down and blending
-
Stopping practice when progress slows
These challenges are normal. Skill is built during slow progress. Every dent teaches you something. Improvement is visible in reflection, even when small.
If the dent moves at all — you are improving.
Progress Timeline
Progress in PDR comes in waves. The early stage feels challenging because your eyes and hands are learning coordination. Once reflection reading becomes easier, your repair quality jumps noticeably. Then speed improves naturally.
| Stage | Skill Focus | Progress Sign |
|---|---|---|
| Early | Reflection Reading & Tool Stability | You can find the center more consistently |
| Development | Pressure Control & Blending | Repairs finish cleaner and need less correction |
| Proficiency | Efficiency & Repair Strategy | Repairs look invisible and finish faster |
The key is to remain consistent.
Key Takeaways
Practice is the foundation of PDR mastery.
The light board teaches you how to see the dent — it is your guide.
Progress is measured in control, not speed.
Consistency builds confidence. Confidence builds results.
FAQs
Q: How often should I practice?
Short, daily practice builds skill faster than occasional long sessions.
Q: How do I know I’m improving?
Your repairs require fewer corrections and your tool control feels calmer.
Q: What if a dent is too difficult?
Move to an easier dent and return later. Confidence builds through success.
Conclusion
Practicing PDR at home transforms training into real ability. With the right panel, lighting, and structured drills, your skill will grow naturally and steadily. If you’d like guidance choosing a practice setup, starting your first drill routine, or building a progression plan tailored to your pace, call 800-304-3464 and we’ll help you practice with clarity, confidence, and momentum.